Overview
This site is a wormhole mass tracking tool for EVE Online. It helps you plan and execute wormhole rolling with precision by tracking every ship pass and computing tight bounds on remaining mass. Or maybe you really don't want to get rolled out, track your pvp or pve ships through wormholes.
What You Can Do
- Track mass passing through wormholes — record each ship pass and the observed state change to build up a picture of how much mass remains.
- Plan and execute rolling — use the draft preview to see whether your next pass will push the hole across a state boundary before you commit.
- Handle uncertainty — log estimated mass ranges for passes you didn't witness (intel, previous traffic). The engine carries that uncertainty forward correctly.
Key Features
- Wormhole mass variance — every wormhole has ±10 % mass variance. The engine tracks all possible true sizes simultaneously (the graph y-axis shows the range).
- Uncertain ship masses — ships can have a mass range (e.g. with prop mods). The engine handles ranges, not just fixed values.
- Virtual Hangar — save ship templates with named travel modes so you can quickly assign ships to either side of a wormhole.
- Sessions — save up to 25 wormhole tracking sessions that persist across browser reloads. Switch between them at any time.
- Draft & Calculate — draft ships to preview the mass impact, then calculate the pass to record the observed state.
- Geometry chart — a live 2D chart showing the feasible region of (cumulative passed, total mass) with state boundary lines and draft overlays.
Virtual Hangar
The Virtual Hangar is your personal fleet library. It stores ship templates so you can quickly assign ships to either side of a wormhole without re-entering mass values every time. Templates persist in your browser via IndexedDB, so they survive page reloads.
There are three template types, each suited to different tracking scenarios:
- Ship — A single hull with named travel modes. Pick a real EVE ship to fill its base mass automatically, or leave the picker blank for custom mass entry.
- Quick Mass — A simple numeric mass entry for one-off passes when you don't need a full ship template. Great for scouts or throwaway rolling ships.
- Fleet — Represents a group of ships as a single mass range. Paste a ship list or d-scan, and the app looks up hull masses from its ship database to compute Cold and Hot totals automatically. A composite thumbnail shows up to four of the most common ship types.
Fleet Templates
- Click + Add Fleet and paste a ship list (one ship name per line) or a raw d-scan into the text box.
- Click Parse / Calculate to look up hull masses and fill in Cold and Hot totals. The fleet name is suggested automatically based on the most common ship type.
- Check Use Custom Mass to override the calculated totals with your own values — useful if the fleet has unusual fits.
- Fleet instances in the side panel use Cold, Hot, and Unknown modes, just like ship templates.
Ship Templates
- Use Select ship to choose a hull from the EVE ship database. The form shows its hull size badge and thumbnail, then fills Cold mass from the ship's base mass.
- Choose a Prop Mod size to add a Hot mode. The app only enables prop sizes that fit the selected hull; oversized prop fits add an OP tag to auto-generated names.
- Toggle Higgs when the fit has a Higgs Anchor. Higgs doubles Cold and Hot mass, including the prop-mod mass, so a 100 Gg battleship with a large prop becomes about 200 Gg Cold and 300 Gg Hot.
- For HICs and the Odysseus, enter Entangle mass manually. If an entangle value is set, auto-generated names include ENT.
- Check Use Custom Mass to keep the selected hull identity and icon while entering manual mass values, for example if you have armor plates fitted.
Working with the Hangar
- Click + New Ship to open the template form. Auto-generated ship names update with Higgs, OP, and ENT tags until you type your own name.
- Use the S, M, L, and XL filter buttons to show saved real-ship templates by hull size. Custom templates appear under All.
- Click Hide at the end of the filter buttons to collapse the hangar list down to its title bar; click Show to expand it again.
- Use the ◀ L and R ▶ buttons on a template card to place a copy on the left or right side of the wormhole. You can place multiple copies of the same template.
- Use the ▲ and ▼ buttons to reorder ships within a side panel.
- Edit or delete templates at any time — existing copies on the sides are not affected.
- Hit Restore Defaults to re-add the starter ship templates if you've deleted them.
Tips
- If you enter only a min value and leave max blank, the max will be set to the same value — handy when you know the exact mass.
- You can use decimal places for accuracy (e.g. 301.5 Gg).
- Consider replacing the default ship templates with your own fits. The defaults are a starting point — your actual ship masses may differ.
Sessions
Each wormhole you track is stored as a session. Sessions persist in your browser, so you can close the tab and come back later. You can have up to 25 saved sessions at a time.
Starting a Session
- Click + New Session to open the wormhole selection screen.
- Use the filters to find your wormhole — type a code directly, or filter by Appears In (where the hole spawns), Destination (where it leads), and Max Ship Size.
- Star your frequently used wormholes to add them to the favourites bar at the top of the selection screen for quick access.
- After selecting a wormhole, choose the current state: Stable and Fresh (you saw it spawn), Stable, Destabilized, or Critical. This tells the engine how much mass may have already passed.
Managing Sessions
- Session tiles appear in the bar below the hangar. Click a tile to switch to that session.
- Rename a session by clicking its name in the tile — it becomes editable inline. Press Enter or click away to save.
- Delete a session using the × button on its tile.
- The tile shows the wormhole code, number of passes, and when the session was created.
- If you have many sessions, the bar scrolls horizontally.
- Click the 📋 button on a session tile to open session notes — a free-text scratchpad for that session. Notes are saved automatically when you close the popup.
Calculating Ship Passes
After ships have passed through the wormhole in EVE and you've noted the new state, you record that information here. Place ship templates on a side panel, then draft the ships that passed by clicking their mode buttons (e.g. "Cold", "Hot"). Each drafted ship highlights and its mass is added to the draft total in the Calculate Pass bar below the chart.
Drafting Passes
As you draft ships, a translucent blue overlay appears on the geometry chart showing where the cumulative mass would land — useful for planning future passes before they happen in-game.
When the draft envelope crosses a state boundary, the calculator clips it against each state band and shows a chance of state change percentage breakdown below the chart. For example:
Reading the percentages:
- Dark grey, not hoverable — a true 0% chance. That state is unreachable from the current state (e.g. you can't go back to Stable from Destabilized).
- Coloured, hoverable, shows 0.0% — not actually zero. The fraction is too small to show at 1 decimal place but there is a non-zero chance. Hover to see the precise value in the tooltip (e.g. 0.0% might reveal crit: 0.00347%).
- Hover over any coloured percentage to highlight the corresponding clipped sub-polygon on the chart, showing exactly which region belongs to that state.
You can draft ships from both sides in the same pass — the solver treats it as one combined mass event.
Recording a Pass
A pass records two things together: the mass that went through and the wormhole state you observed afterwards. The solver needs both — the mass narrows the remaining range, and the observed state constrains which part of that range is actually possible. That's why the Calculate Pass bar requires drafted ships and a selected state before you can commit.
- Draft the ships that passed by clicking their mode buttons on the side panels.
- Select the observed state after the pass — Stable, Destabilized, Critical, or Gone — using the radio buttons in the Calculate Pass bar.
- Click Calculate Pass to commit. The solver recalculates the feasible region and the chart updates with a new event polygon.
- Ships that passed move to the opposite side automatically.
- Use Clear to un-draft all ships without calculating, or click individual mode buttons to toggle ships on/off.
- Rename a ship instance by clicking its name on the side panel — it becomes editable inline. Handy for labelling which pilot is flying which ship.
- If you make a mistake, you can undo events by clicking the × button next to them in the events table.
Impossible States
If you record a pass and the selected state is impossible — for example, reporting Stable after enough mass has passed that the hole must be destabilized — the event row will show "This state is impossible for the given information" instead of the usual geometry columns. This means the solver cannot find any feasible region where the observed state is consistent with the cumulative mass passed so far.
When this happens, check that you selected the correct state after the pass and that the ship masses are accurate. You can delete the invalid event with the × button and re-enter it with the correct state.
The most common cause is selecting the initial state as Stable & Fresh when you don't actually know how much mass has already passed. Fresh assumes zero prior usage, so the solver has a much tighter feasible range. If the hole's history is unknown, use Stable instead — this allows for the possibility that some mass has already gone through.
Results & Graph
After each pass the constraint solver recomputes the feasible region and renders it on the geometry chart.
Reading the Axes
- X axis (horizontal) — Cumulative mass passed through the wormhole so far, in Gg. This grows with every pass you send.
- Y axis (vertical) — Total original mass of the wormhole, in Gg. Because the game only tells you a range (e.g. 2,700–3,300 Gg), the chart plots every possible value in that range.
Coloured Areas
Each event pass draws two overlapping polygons on the chart:
- Translucent dashed outline — The possible region. This is the broadest area where the true cumulative + wormhole-mass point could lie, given everything observed so far.
- Solid filled area — The certain (known) region. Mass that has definitely passed through — there is no uncertainty here. This grows as you send more passes with exact masses.
The colour of these areas reflects the wormhole state reported after that pass:
- Green — Stable (more than 50 % mass remaining).
- Yellow / Amber — Destabilized (between 10 % and 50 % remaining).
- Red — Critical (less than 10 % remaining).
- Dark grey — Gone (the wormhole has collapsed).
State Boundary Lines
Three diagonal lines cross the chart showing where state transitions happen:
- Yellow line — Destabilization boundary (50 % mass remaining). Crossing this line means the hole goes from Stable to Destabilized.
- Red line — Critical boundary (10 % remaining). Past this the hole is in a critical state and could collapse at any time.
- Grey line — Gone boundary (0 % remaining). Reaching this line means the wormhole has fully collapsed.
Draft Preview (Blue Overlay)
When you draft ships for a pass, a translucent blue overlay appears showing where the cumulative mass would shift to if you send that pass. This lets you preview whether the pass will push the wormhole across a state boundary — helping you decide if it's safe to commit.
Example 1 — Stable Passes + Draft
A 2,700–3,300 Gg wormhole. A total of 1,300 Gg has been sent through across multiple passes (all Stable), and a 300 Gg ship is drafted.
▶ Click the event numbers below to see the chart at each step.
- The first pass of 0-10 represents intel that several scouts may have passed. The green dashed outline is very thin — almost no cumulative mass, but the full Y range is possible.
- After 1,300 Gg of rolling battleships have passed, the solid green area shows the certain mass. The dashed outline extends ~10 Gg further to account for the scout uncertainty. Everything is still within the Stable zone (left of the yellow destab line).
- The blue overlay previews a drafted 300 Gg pass. It would push cumulative mass to ~1,600–1,610 Gg — right on the yellow destab line, meaning this pass may or may not destabilize the hole.
Example 2 — Uncertainty + Destabilization
Same wormhole (2,700–3,300 Gg), but this time there's early uncertainty and the hole destabilizes.
▶ Click the event numbers below to see the chart at each step.
- Intel suggests a medium T3C fleet may have passed — you can't be sure, so you log 0–200 Gg. The green dashed outline spans the full 0–200 range on the X axis with no certain region (it's all uncertain).
- You push 1,200 Gg of rolling battleships through and the hole stays Stable. The solid green certain area reaches 1,200 Gg. The dashed possible region extends to ~1,400 Gg because of the 0–200 uncertainty from Pass 1. Notice the possible region clips against the destab line — the solver knows the hole can't be past that boundary while still showing as Stable within Eve (and recorded as such here).
- Another 300 Gg goes through and the hole Destabilizes. The polygons turn amber. The certain and possible regions are now irregular pentagons — constrained by the destab boundary (must be past 50 % used).
- The blue draft overlay shows a 300–400 Gg range pass being considered. Because of the accumulated uncertainty, the draft envelope is wider and angled — it follows the shape of the destabilized polygon shifted right.
Fresh Holes
Battleship-sized wormholes
The Method: Push exactly half the nominal mass through the hole to learn whether it is above or below nominal size, then finish the roll with the right number of ships.
This guide assumes Rolling Battleships with a Higgs Anchor fitted, so you can pass the wormhole Cold (prop mod off) for ~200 Gg or Hot (prop mod on) for ~300 Gg.
Note: Small differences — e.g. your Rolling Battleships are not exactly 300 Gg, or you send scouts out — can occasionally produce edge cases where this procedure doesn't close the hole, or rolls you out.
Quick Reference
| Hole | Step 1 | Destabilized? (below nominal) | Still Stable? (above nominal) |
|---|---|---|---|
| 3000 Gg | 3 COLD, 3 HOT | 3 COLD, 3 HOT | 6 HOT |
| 2000 Gg | 2 COLD, 2 HOT | 2 COLD, 2 HOT | 4 HOT |
| 1000 Gg | 1 COLD, 1 HOT | 1 COLD, 1 HOT | 2 HOT |
Example Case — 3000 Gg
3 Cold and 3 Hot passes → check state:
↓ Destabilized (small hole) — 3 Cold and 3 Hot passes
↓ Stable (large hole) — 6 Hot passes
▶ Click the event numbers below to see the chart at each step.
Step 1 — Scout & Send Half Mass
- Jump a CovOps through to see what's on the other side (1 Gg). The hole stays Stable.
- Send 3 Rolling Battleships (BS) out Cold. Still Stable.
- Draft: Bring 3 Rolling Battleships back Hot for 1,500 Gg total. The blue draft line sits right on the destab boundary — this pass will reveal whether the hole is above or below nominal.
Step 2 — Read the Result
The hole either Destabilizes or stays Stable. This tells you if it's a small or large hole, and determines how many to complete the roll.
It Destabilized → Small Hole (3 COLD and 3 HOT again)
- The first BS passes Destabilized the hole — it's a smaller hole (≤ 3,000 Gg). The excluded band at the top confirms larger sizes are ruled out.
- 3 Cold and 3 Hot passes to roll the hole:
- Send 3 BS out Cold. Still Destabilized.
- Bring 2 BS back Hot — the hole goes Critical.
- Final 1 back Hot — Gone. Hole collapsed.
Still Stable → Large Hole (6 HOT)
- The first BS passes left the hole an unchanged Stable — it's a larger hole (≥ 3,000 Gg). The excluded band at the bottom confirms smaller sizes are ruled out.
- 6 Hot passes to roll the hole:
- Send 3 BS out Hot. Destabilized.
- Bring 2 BS back Hot — the hole goes Critical.
- Final 1 back Hot — Gone. Hole collapsed.
You can also do it with 6 battleships in one pass, just make sure the final jump is Hot (reverse order can lose you a BS)
Stable Holes — Simple Method
Battleship-sized wormholes with unknown prior traffic
This is the quickest method to remember. It requires a HIC (Heavy Interdictor) and can need up to 3 HIC passes. There is a very small risk of rolling out a ship.
Overview
- Pass BS until Critical. While the hole is still Stable or just Destabilized you can send many at once, but as you approach Critical send them one at a time.
- BS on the far side? If the hole goes Critical with a BS on the far side, bring it back Hot to attempt a roll.
- No BS on the far side, or the roll attempt failed? Use HIC passes (fully entangled out, then Hot back) to finish the hole.
Size-specific Notes
| Hole | Phase 1 (to Crit) | Notes |
|---|---|---|
| 3300 Gg | BS Hot until crit | Very tiny chance (~0.01%) of HOT pass that is close to crit going straight from destab to gone |
| 3000 Gg | BS Hot, switch to Cold near crit | ~2.5% chance of destab → gone on a HOT pass; use Cold when close to critical |
| 2000 Gg | BS Cold (180 Gg Praxis) near crit | Smaller hole needs more care approaching critical state. The smaller Praxis BS is safer to use to avoid roll out |
Each fully-entangled HIC pass also carries a small risk (< 1%) of being rolled out.
For a safer alternative that removes these risk windows and doesn’t need a HIC at all, see Stable — HIC-Free in the sidebar.
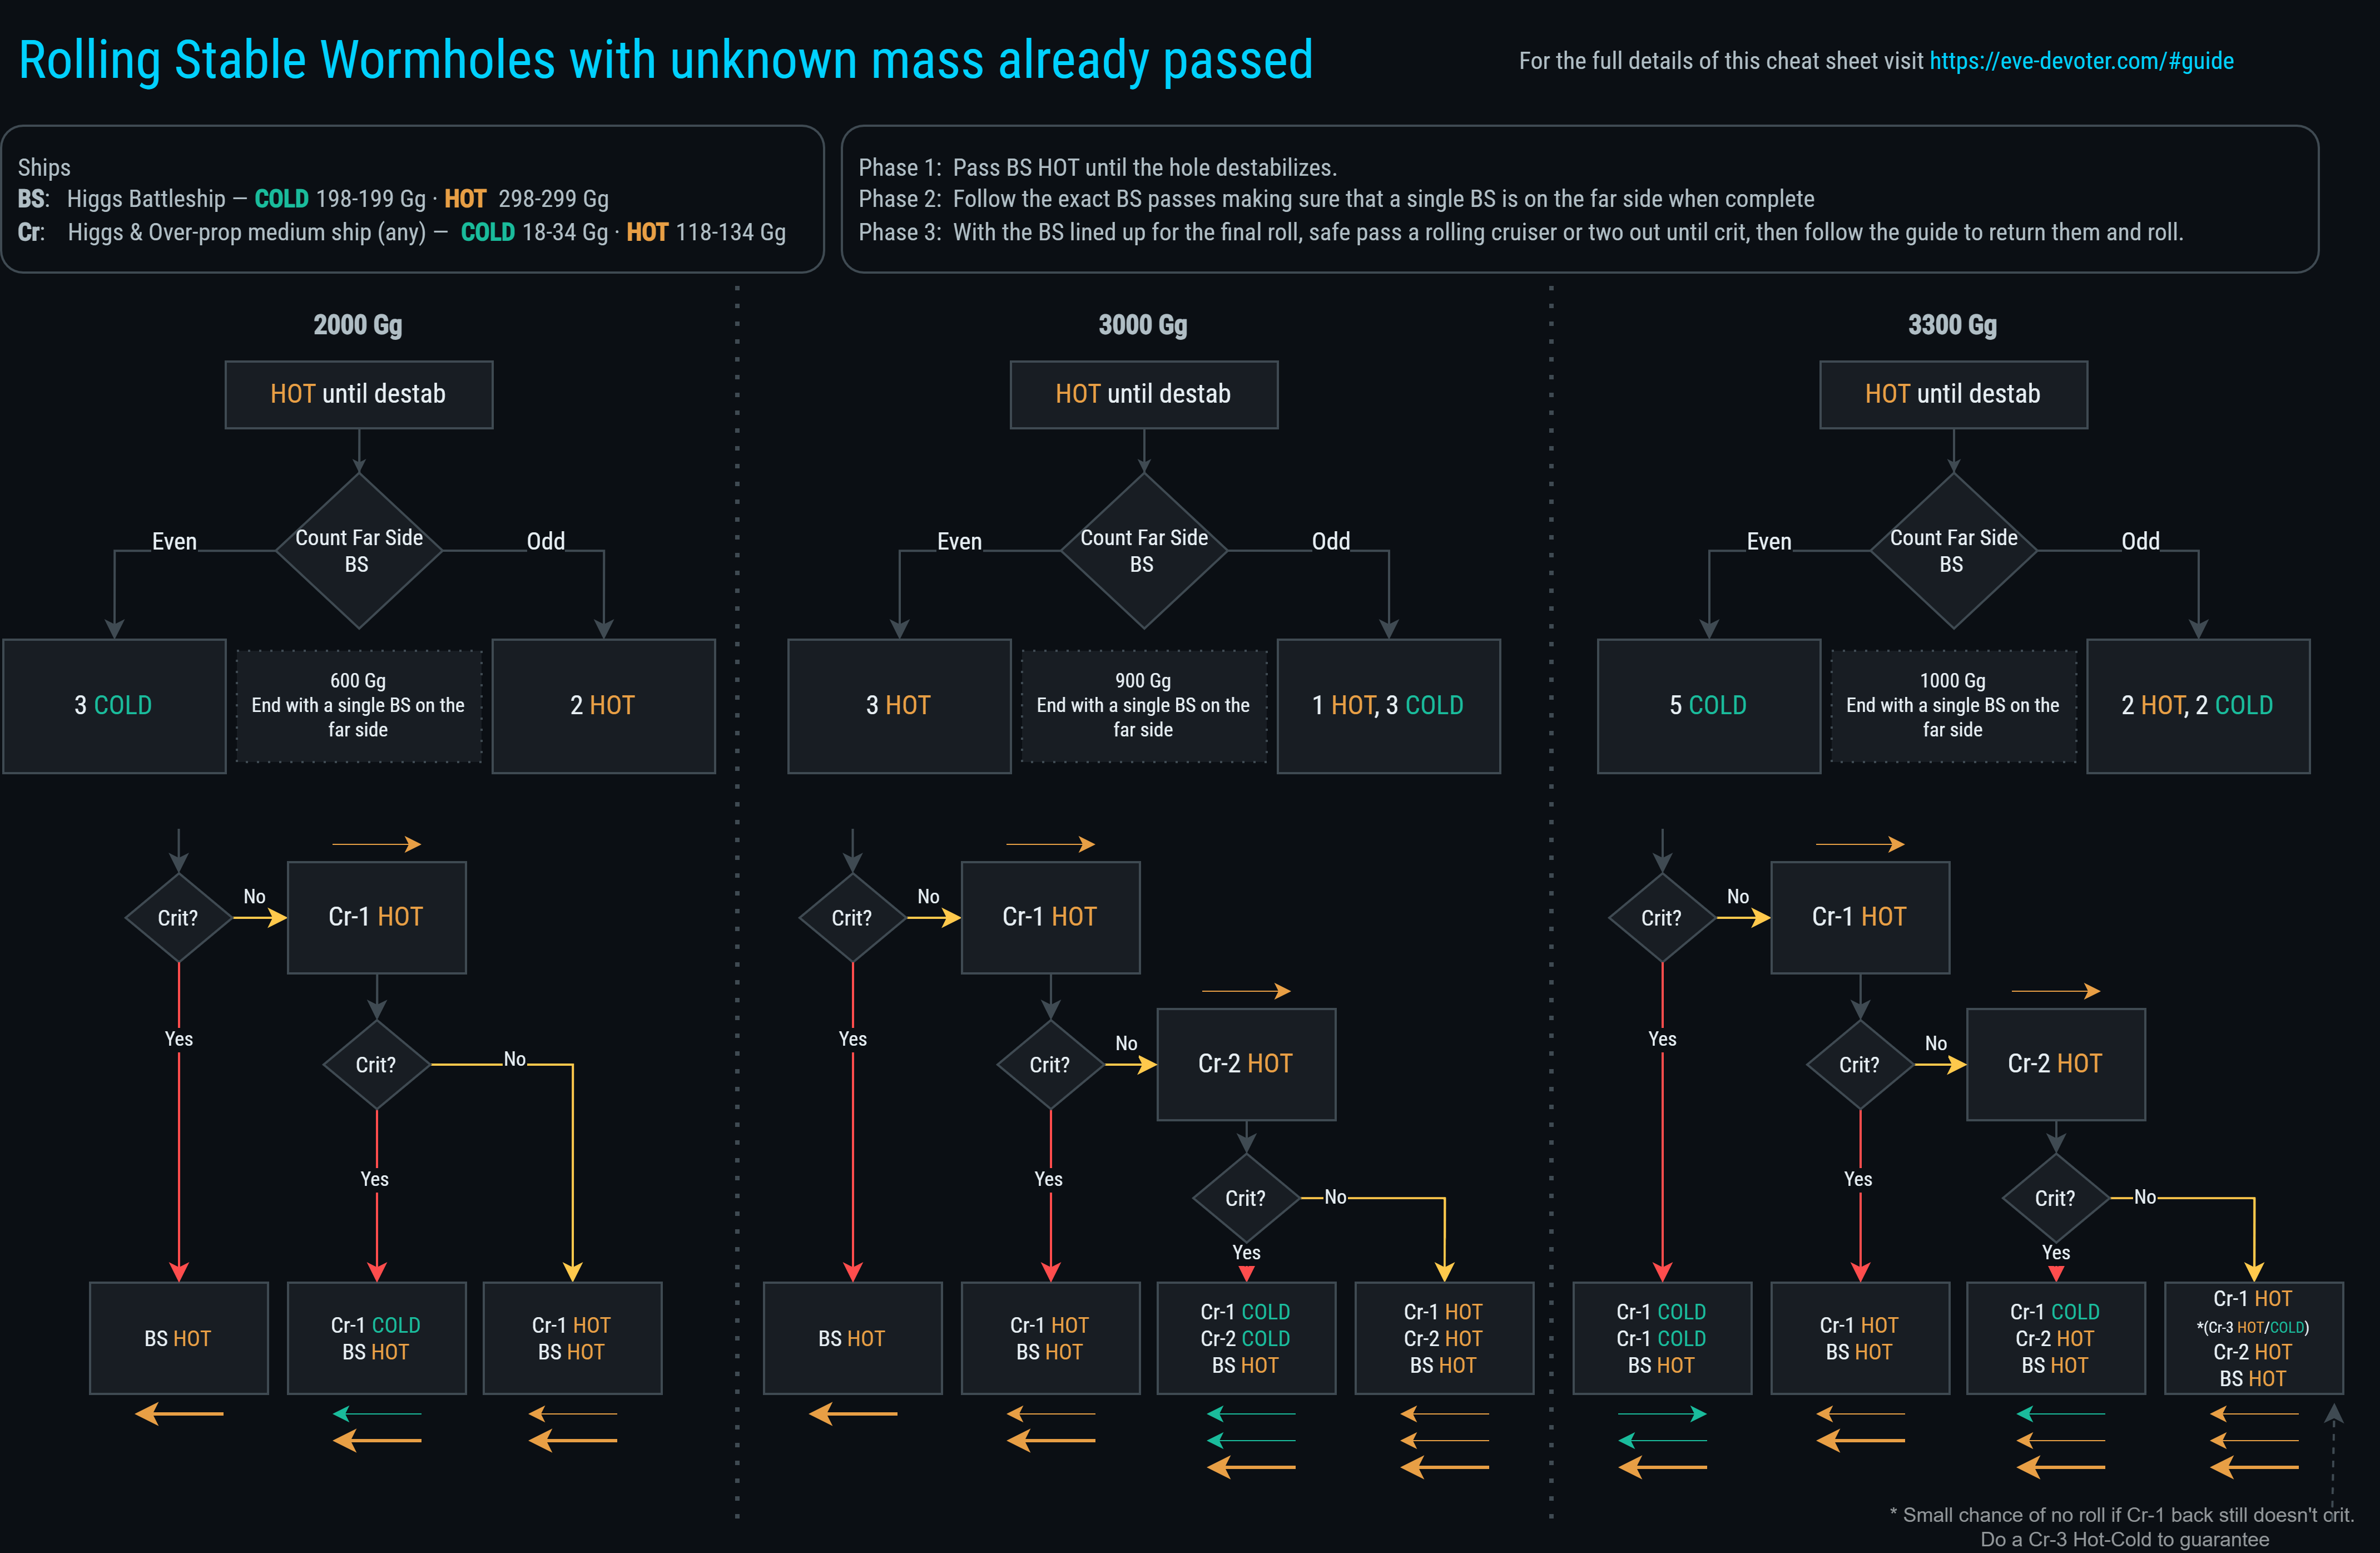
Stable Holes — HIC-Free Method
Battleship-sized wormholes with unknown prior traffic
- No HIC required — cruisers or haulers work. (less SP needed, and cheaper)
- Eliminates the tiny rollout risks from the simple method.
- All steps use multiple pilots / ships — with no need to wait for re-approaches it is faster.
- The exact same method works for doorstopping as you will always have a single BS on the far side with a final roll ready
You are encouraged to enter your exact ship masses in the calculator and track passes while learning the method — this helps you understand why it is safe.
Ships
| Role | Fit | Cold | Hot |
|---|---|---|---|
| BS | Higgs Battleship | 198-199 Gg | 298-299 Gg |
| Cruiser | Higgs + Overprop fitted Cruiser / Hauler | 18-33 Gg | 118-133 Gg |
Any cruiser or battle cruiser will work here, also a Sigil.
A HIC is not required but can fill the cruiser role (Hot/Cold, no entangle needed).
Three-Phase Overview
- Phase 1 — Destabilize: Send BS Hot, checking state after each jump until Destabilized. Note how many BS are on the far side when that happens. (Don’t exceed the “max” in the table below for ships on the far side at any one time.)
- Phase 2 — Fixed Mass: Pass a precise amount through the hole to approach or slightly cross the Critical threshold. The recipe depends on whether you had an odd or even number of BS on the far side, with the goal of ending with exactly 1 BS on the far side.
- Phase 3 — Cruiser Probe & Roll: Use cruiser passes and the timing of the hole going Critical to safely determine when to bring back the final BS for the roll.
There is room for 1 frigate / destroyer scout on the far side if they go out before Phase 1 and return during Phase 3. Possibly a lot more space too — use the tracker for each hole to confirm.
The reason to use hot BS passes is to destabilize the hole as quickly as possible.
In this phase it is OK to queue up a bunch of BS on the hole and jump out one by one, checking the state and stopping when destabilization occurs. Stack up the BS on the far side while doing this — don’t bring them back yet. If you run out of battleships, or you reach the max of 4/5/6 on the far side, then start sending them back one at a time. This reduces any unnecessary polarization and is faster because you are never waiting for a re-approach.
Before this phase we know very little about the mass on the hole. It could be a larger variant with no mass passed, or a smaller variant just about to go destab. Either way, once we hit destab we have a much clearer idea of where we are up to.
At the point of just hitting destabilization you could have between zero and six BS on the far side. Note whether it is an even number (zero is even) or odd, so that the next instruction will be tailored to leave you with a single BS remaining on the far side at the end.
It is still up to you to work out which jumps to do. For example, if you have 1 BS on the far side of a 3000 Gg hole and the instruction says 1 hot, 3 cold — you would do 2 out, 2 back. Or a 3300 Gg hole with 4 on the far side — you would do 4 back cold, 1 out cold.
All of these Phase 2 jumps can happen at the same time — no need to check state, as we are just eating up the destab region. We might just about crit the hole with the last jump; that can be checked at the end.
This single BS remaining gives us 300 Gg of variance on the final roll to play with. The hole can have 1 Gg of mass left or 299 Gg and we can still roll.
With a BS sat ready for the final roll on the far side, we will use cruisers to crit the hole safely, then use safe return passes — checking available mass — to roll the hole.
The roll guide flowchart can be followed without checking mass closely and will work for any cruiser fit between 18 and 33 Gg. This is basically all cruisers from the Cynabal (smallest) to the Devoter (largest). You can use a combat-fit Hurricane if you like (~27 Gg) as long as it is Higgs and 100MN fitted. A Sigil is also a cheap, easily skilled option (~22 Gg) but is slow on re-approach.
The 3300 Gg hole could need 3 cruisers. If after 2 have gone out hot and 1 back hot the hole is still not crit, there is a chance the final cruiser plus BS returning hot will still not close the hole. In that case, do a 3rd cold–cold cruiser pass before the final cruiser/BS combo come back hot. This can be avoided by using a ~30 Gg cruiser, which guarantees the need for only 2 cruisers here. A Maller with 800 + 400mm T2 plates is recommended.
Quick Reference — All Sizes
| Hole | Phase 1 | Phase 2 (Even) | Phase 2 (Odd) | Phase 3 |
|---|---|---|---|---|
| 3300 Gg | BS HOT ×1–7 max of 6 on far side |
5 COLD (1000 Gg) |
2 HOT, 2 COLD (1000 Gg) |
see decision tree or pop out quick reference |
| 3000 Gg | BS HOT ×1–6 max of 5 on far side |
3 HOT (900 Gg) |
1 HOT, 3 COLD (900 Gg) |
see decision tree or pop out quick reference |
| 2000 Gg | BS HOT ×1–4 max of 4 on far side |
3 COLD (600 Gg) |
2 HOT (600 Gg) |
see decision tree or pop out quick reference |
Worked Example — 2000 Gg (Odd Path)
▶ Click the event numbers to step through the chart.
Phase 1 — Destabilize
Send BS out Hot one at a time. In this example three passes trigger Destabilized, leaving 3 BS on the far side (odd).
- Initial state: Stable. Unknown prior traffic means 0–1100 Gg may already have passed.
- BS-1 out Hot (299 Gg) — still Stable.
- BS-2 out Hot (299 Gg) — still Stable.
- Draft: if BS-3 goes Hot, the blue draft straddles the destab line — it might destabilize.
- BS-3 out Hot (299 Gg) — Destabilized! 3 BS on the far side (odd).
Phase 2 — Fixed Mass (Odd: 2 HOT = 600 Gg)
Goal: pass 600 Gg and end with exactly 1 BS on the far side. Odd path with 3 currently on the far side: 2 BS come back Hot.
- BS-1 back Hot (299 Gg) — still Destabilized.
- BS-2 back Hot (299 Gg) — still Destabilized. 1 BS remains on the far side. Crit was possible here, but for this example we will use destabilized.
Phase 3 — Cruiser Probe & Roll (2000 Gg)
The remaining hole is close to Critical. Use a cruiser to push to critical.
- Draft: the cruiser Hot pass (132 Gg) straddles the critical line, but would still leave room to return cold without rolling out the BS.
- Cruiser out Hot (132 Gg) — Critical! Destab was possible here, but for this example we will use crit
- Cruiser back Cold (32 Gg) — still Critical. Safe to bring the BS home.
- BS-3 back Hot (299 Gg) — Gone! Hole collapsed.
Phase 3 Decision Trees
3300 Gg
2 cruisers needed. After Phase 2 you have 1 BS on the far side.
- Crit?
- Yes: Cruiser #1 Cold, Cruiser #1 Cold, Final BS Hot → Roll
- No: Cruiser #1 Hot
- Crit?
- Yes: Cruiser #1 Hot, Final BS Hot → Roll
- No: Cruiser #2 Hot
- Crit?
- Yes: Cruiser #1 Hot, Cruiser #2 Cold, Final BS Hot → Roll
- No: Cruiser #1 Hot, Cruiser #2 Hot, Final BS Hot → Roll (~2% no-roll; if the first cruiser hot back still doesn't crit do CR-3 Cold, Cold first for 100% roll)
- Crit?
- Crit?
3000 Gg
2 cruisers needed. After Phase 2 you have 1 BS on the far side.
- Crit?
- Yes: Final BS Hot → Roll
- No: Cruiser #1 Hot
- Crit?
- Yes: Cruiser #1 Hot, Final BS Hot → Roll
- No: Cruiser #2 Hot
- Crit?
- Yes: Cruiser #1 Cold, Cruiser #2 Hot, Final BS Hot → Roll
- No: Cruiser #1 Hot, Cruiser #2 Hot, Final BS Hot → Roll (~2% no-roll; if the first cruiser hot back still doesn't crit do CR-3 Cold, Cold first for 100% roll)
- Crit?
- Crit?
2000 Gg
1 cruiser needed. After Phase 2 you have 1 BS on the far side.
- Crit?
- Yes: Final BS Hot → Roll
- No: Cruiser #1 Hot
- Crit?
- Yes: Cruiser #1 Cold, Final BS Hot → Roll
- No: Cruiser #1 Hot, Final BS Hot → Roll
- Crit?
Try entering your exact ship masses and tracking a real roll in the calculator — seeing the geometry update live is the best way to build intuition for why each step is safe.
